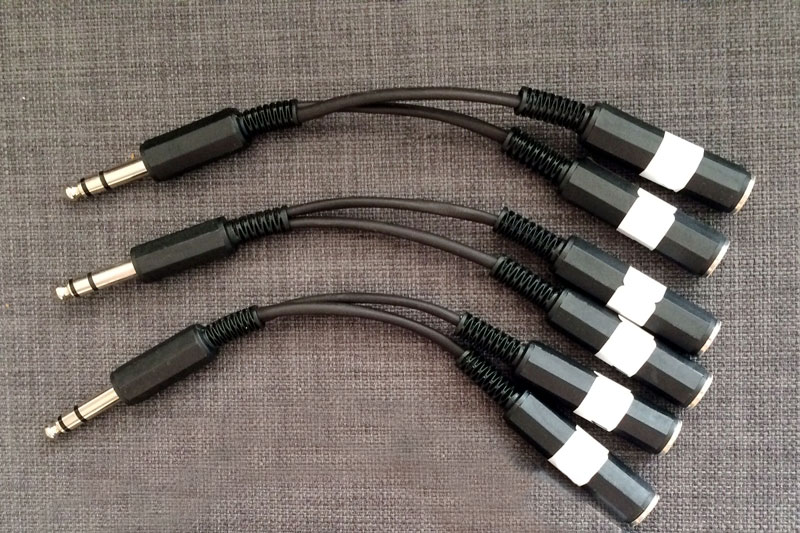
Electronic drum splitters, also called drum trigger splitters, are awesome inventions! These simple devices allow you to add many additional trigger pads and cymbals to your edrums, even if your module is already fully maxed out in terms of the pads it can handle.
How is this possible? Will trigger splitters work on every module? What are the pros and cons of drum trigger splitters? These questions are probably on your mind and we have the answers for you!
This post delves into the use of edrum splitters and provides guidance for the best practices to achieve optimal results on your module. This is part 1 of a 2 part series.
Electronic Drum Trigger Splitter Basics
Splitters can be used on any drum module that allows separation of the head and rim zones on drums or separation of the bow and edge zones on cymbals. This includes most full-feature Roland and Yamaha modules, as well as select modules of other brands and quality levels. There are some exceptions to this rule, such as the Roland TD-25 module, which although being a great sound module, does not allow for splitting of zones, making splitters impractical to use. (PS: This was an incredibly stupid design choice by Roland that damned this module to a fraction of the popularity that it could have attained. Please NEVER do this again Roland! Thank you.)
If your module DOES NOT allow the separation of different zones on individual trigger pads, then you are out of luck and can not utilize trigger splitters.
Yamaha has long used trigger inputs on many of its modules that were specially designed for use with splitters. These input jacks are often labeled with 2 trigger numbers to show users that splitters are not only possible, but easily configured within the module. Good for you Yamaha!
When you connect a splitter to the module, you can then connect it to 2 different pads of any type when only one was connected to the module in the same place before. Technically, this allows you to get 2 inputs for every 1 you already have. However, as you will see in the best practices section, this is actually an exaggeration, since most people will NOT want to split some triggers or risk losing much of their functionality. More about this in the final section.
Drum Splitter Installation
There are different types of splitters designed to work in similar, but slightly different ways. Some splitters are specifically designed for some modules, or brands of modules, while others are basically universal. It is always best to buy splitters that are specifically described as working with your exact drum module for best results.
It is actually super easy to make drum splitters yourself if you are a handy DIYer. All you really need are proper cables, a soldering gun and solder, some proper jack connectors and possibly a resistor. There are some great videos on YouTube about making drum splitters for those who want to use many of them, want to sell them or simply like the challenge of DIY compared to buying them pre-made commercially.
Once you have the splitters you want to use, installing them is simple:
If your module uses individual cables to connect each drum and cymbal (as opposed to a single cable “snake” called a DB-25), then you can connect 2 wires coming from each trigger to a splitter which plugs into a single input on the module. This involves use of a dual female input, male output splitter. No additional cables will be necessary. Alternately, you can also connect a single wire from the module into the splitter, then connect 2 output wires into each trigger if you prefer, but this involves getting 1 extra cable per split pair. This second approach is used for splitters with all female connections.
If you have a DB-25 cable snake, then you can not plug in splitters into your module, except using extra AUX or CRASH 2 jacks that it may feature. The approach above will work fine if you do simply want to use splitters on the CRASH 2 or AUX inputs, since they are separate and likely to be stereo and therefore splittable. However, if you want to split a trigger that is part of your cable snake (DB-25), then you will have to utilize an all female splitter to connect to the output cable, then connect 2 other cables from the splitter to each trigger you want to connect. This will involve buying the splitter and 2 extra cables per pair of split triggers.
The best splitters come with complete and detailed directions. This can be important when configuring the splitter in the module, since plugging everything in is just step one… Configuring is where the real work begins! However, it is not that hard…
Best Practices for Electronic Drum Trigger Splitters
Ok, so without going into tons of details that only apply to specific types of splitters, let’s talk about some general rules and observations that apply to all or virtually all of these accessory products:
Drums split much better and more accurately than cymbals. Example, splitting a tom into 2 toms will work flawlessly (100% accurate) when configured correctly. We use this approach often, so we are completely sure that it is perfect!
Cymbals will work acceptably to rather well, but it is very difficult to split 1 cymbal into 2 and have them both work flawlessly all the time.
Similarly, when a drum and cymbal is split from a single trigger, the drum tends to function better than the cymbal in terms of accuracy and predictability.
NOTE: When using drum splitters, you will not be able to hit the 2 split pads simultaneously. Keep this in mind when you are deciding how to split them. For example, you would not want to split toms 3 and 4, since you are likely to hit them together. Better to split tom 3 from tom 1 and tom 4 from tom 2, for example. You also have to be careful how you split your kick, since many times, you will hit the kick with another pad. I like to use my split kick to power a side stick pad, since I will rarely hit this instrument with the kick (does not apply to reggae players!). This provides yet another reason not to split cymbals, since now you have to remember which you can and can not hit at the same time.
Knowing all this, here are our tips:
Only split cymbals if you really need to do so. Instead, split all your toms and free up more inputs for individual dual zone cymbals whenever possible. For example, on a 4 tom set, you can split tom 1 to control tom 1 and 3 perfectly and split tom 2 to control tom 2 and 4. This allows you to use the outputs from toms 3 and 4 to add 4 more drum pads with perfect triggering or 2 dual zone cymbals with perfect triggering. Yes, you can add 4 single zone cymbals, but dialing them in might be more challenging and might not work 100% perfectly.
Always split your bass drum first whenever possible! The kick is always a single mono signal, but the jack is most often a stereo output that can be split. Split this trigger first and lose nothing at all from any other output!
If you have a cable snake, you DO NOT have to adhere to which cable is labeled for which trigger. Yes, you will have to reprogram some things in the module, but you can split triggers as noted above. For example, you can split tom 1 to power tom 1 and 2. The, you can connect the cable that may say tom 2 to crash 2, for example. Since you have to configure the new trigger set up anyway this will not cause much additional work. Now you can use the output cable from labeled tom 2 to power an extra cymbal, with both zones intact or even to connect toms 3 and 4!
The easiest way to use splitters on modules with a cable snake is to utilize the splitters on the CRASH 2 and AUX inputs. This requires no special steps, just follow the directions and get easy, predictable results.
It is never wise to split your snare (you want multiple zones on the snare) or the ride (you want multiple zones on the ride). It is less of a good idea to split other cymbals, since the results will not be as predictable or accurate, as discussed above. Therefore, start with your kick, then toms, then any AUX channels that are not in use.
On a typical flagship module, you can easily and flawlessly add 9 additional triggers without sacrificing any functionality from your existing cymbals, using kick, tom 1-4 and AUX 1-4. This means you can have a total of 23 triggers instead of the maximum of 14 normally provided for!!! All this without changing your snare, ride, hi hats or crashes at all!!! Awesome.
One last piece of advice… READ the DIRECTIONS on your drum splitters! They are included for a reason! LOL.
Best of luck and we hope that this post helped you to fine tune your plan to build a monster drum set using electronic drum trigger splitters.
Part 2 of this series covers the actual drum splitter settings needed to make the best use of your expanded kit.

